Sunday, August 19, 2007

Printable Thank you notes

Do onto others as you would want them to do to you -- the golden rule. While we shouldn't go about doing good with the expectation that the receiver will thank us for it, we should lead the way by thanking people when they have done something we appreciate -- if only as a matter of courtesy. Different people have different ways of saying thank you, to appreciate what someone has done. Perhaps, one of the most affordable ways to thank someone is by sending them a thank you note.

What do you thank people for anyway? I think every time someone gives you a "little piece" of themselves, be it in form of gifts, offering their time to help you plan your wedding. If it cost that person something, you should probably thank them. What better way to do so than through a professional thank you note designed and printed online.

The wordings you decide to use, will of course depend on your situation or what you are thankful for. For example if you received gifts during your baby shower your thank you note may have something along these lines:

Thank you for
the baby gift.
It was very kind
of you. Name
Another verse can be:
We've been blessed . . .
a new baby
and dear friends like you
to share our joy.

NAME

Be creative, both in your choice of words. Give the service a try today and see why others are getting hooked! For more ideas of verses to use, also checkout: VerseIt.com

Saturday, August 18, 2007

Photo Birth Announcements

Congratulations on the new arrival! So your new bounty of joy has finally arrived and you are looking for a very affordable, yet professional way to announce this arrival to your family and friends. Well, you have come to the right place. There are a number of do it your self solutions out there that allows you to select from some templates, customize to your taste and presto! you have very professional baby announcement. Check out the Birth Announcement Maker from quiglow.com.

If you are a hurry, and don't want to get into the hassles of installing any software on your computer just for this purpose, consider using the Design and Print service from the same company. Select from number of professional templates, customize with your text, Save and the print.
See screenshot on the right for where to click when ready to print.

Here's a sample of a photo birth announcement created with this service. Currently you will be able to print 2 copies of the announcements per page. You deserve to announce your baby in style! Enjoy.

Friday, August 10, 2007

Adding your own photos

It is quite easy to add your own photos into the designer. There are specifically two dialogs where you can do this:
  • Backgrounds icon and

  • Graphics set icon

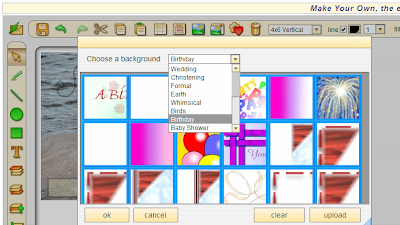
They both appear to work the same way. The background graphics are meant to create a backdrop or theme for your design. Of course you don't have to have a background, you always clear the background to start with a blank/white background.

The above shows one of such dialogs, specifically for the graphics set. So for example, if you have a family picture you like to include and you don't really want it to fill the entire drawing area, you will want to click on the graphics set icon. Note that you can only upload up to 8MB of image.
For best results however, limit the file size to about 100K or less. If you are importing from a digital camera, you would want to convert the file to something smaller using another graphics program suited for that task.

Upcoming features for Design and Print Online will include more comprehensive graphics editing functionalities. Until then, editing will have to occur outside of the designer.

Wednesday, August 8, 2007

Printable Party Invitations Online

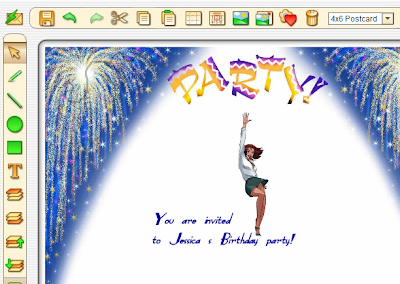
Today, I'd be writing about making professional party invitations that you can design yourself and print online. The online service I'd be describing is the Design and print Online service from quiglow.com. I'd try to be as clear as possible, but please comment if you have any question. Here we go:
  • First signup for an account at http://www.printableonline.com/ if you haven't already done so.
  • Simply login with your account.
  • Click on create a card. The online designer launches in the next page, it might take a few seconds
  • Now for the fun stuff. Select a background for your Party Invitation choosing from over 600 backgrounds with many themes.


  • There are 3 important icons here in the top navigation, see above screen short of the designer, simply mouse over each to see what they are for. The icons I'm talking about are closest to the trash icon. They are: "Select Background", "Adjust Background", and "Select graphics object". Select background is as the name suggest. Simply select a background theme for your party invitations. Sometimes, when the background does not fill the entire designer, click on "Adjust backgroun", which basically makes the image fill the entire work area for the designer.

  • The "Select graphics object", are used to add cliparts to your design. Sometimes you may have to adjust the size of the clipart. Just drag the edge of the graphics object to change the size of the image to your taste.
  • You can alway upload you own backgrounds (such as a family photo) into the designer.

  • You can easily add text to your design so far by clicking on the "T" Icon the left navigation and placing it anywhere on the designer.

  • Always save your work as you go along. Click the Save button on the top navigation.
  • To print or email you invitation to friends, simply click on the top left icon. A dialog appears with a print button towards the bottom as well as a form you can fill to send the invitation to a friend.
  • That's it!